Moisture Mapping Best Practices for Insurance-Ready Water Damage Documentation
Most moisture maps don't fail because the readings were wrong. They fail because the documentation chain has gaps. Here's
what insurance-ready moisture mapping actually requires, from baseline through dry standard verification, under IICRC S500.
Moisture mapping is the systematic process of measuring, recording, and tracking moisture levels across all affected materials in a water-damaged structure. Done correctly, it produces documentation that justifies your scope, defends your drying timeline, and survives adjuster review from initial assessment through verified dry standard.
What You Need to Know
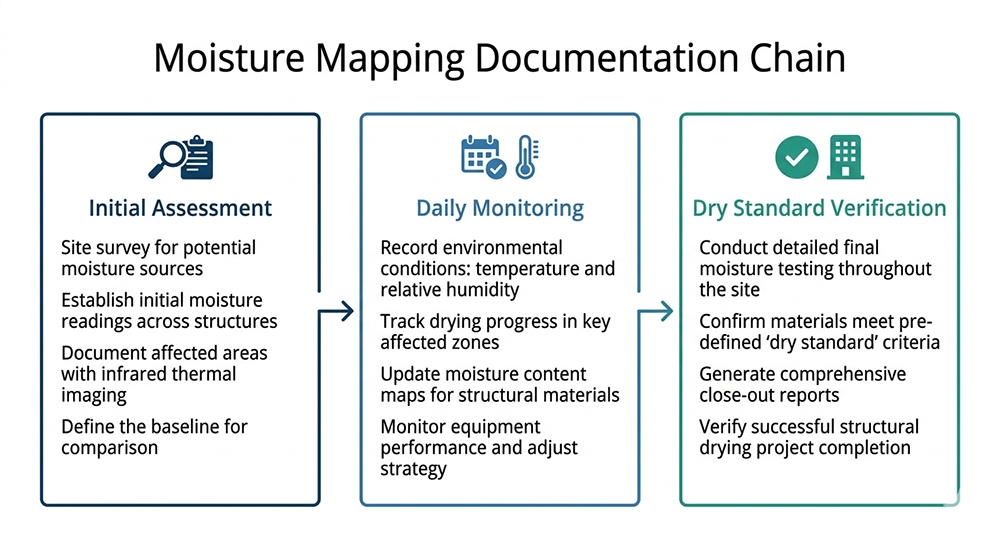
Moisture mapping is not a single task. It is a documentation chain that starts at first contact and does not close until materials return to dry standard. A defensible moisture map requires three things:
Baseline readings across all affected and adjacent unaffected areas
Daily psychrometric data tied to drying progress
A final verification pass confirming materials reached equilibrium moisture content
The most common reason moisture mapping fails insurance scrutiny is not tool selection or technique. It is gaps in the chain: missing baseline readings, incomplete coverage of secondary moisture migration areas, or a closeout file that shows drying equipment was deployed but never proves the work is done.
Carriers are increasingly using automated systems to scan submitted claim files for exactly these gaps, which means the documentation bar is rising whether your team knows it or not. The direct connection between those gaps and how long it takes to collect payment is worth understanding before you look at your AR aging report.
Most restoration companies understand that moisture mapping matters. Where things break down is in treating it as a field task rather than a documentation system.
A technician who takes readings at initial assessment and again at closeout has captured two data points. That is not a moisture map. It is a before-and-after snapshot with nothing in between to show how drying progressed, what equipment was running, what the psychrometric conditions were each day, or when materials actually crossed the dry standard threshold.
An adjuster reviewing that file has no story to follow. And a file without a story is a file that gets questioned.
The documentation problems that appear in moisture mapping are almost always workflow problems first. The field team is doing the work. The readings are being taken. But the system for capturing, organizing, and connecting that data into a defensible chain breaks down somewhere between the job site and the closeout file.
That is what this post addresses.
Moisture mapping is not a single task. It is a documentation chain that starts at first contact and does not close until materials return to dry standard. A defensible moisture map requires three things:
Baseline readings across all affected and adjacent unaffected areas
Daily psychrometric data tied to drying progress
A final verification pass confirming materials reached equilibrium moisture content